Live streaming has become an increasingly popular medium in recent years for a variety of reasons. It allows audiences around the world to interact with content creators in real-time; it provides much more cost-effective alternatives than traditional television broadcasts; and it gives anyone with an internet connection the opportunity to reach large audiences without having access to expensive studios and equipment. With advances in technology now allowing for 3D virtual studio sets to be used in live streaming production, even more possibilities are opened up for content creators who want to create professional-quality broadcasts from home or on the go.
Incorporating a 3D virtual studio set into your live stream offers a number of benefits that you wouldn’t get simply by using a traditional 2D camera setup. One of the main advantages is being able to add extra dynamism and depth by creating multiple angles during filming, whereas with regular cameras this would not be possible due to space constraints or budget restrictions. Additionally, as a content creator, you can also customise your virtual set according to your own vision as well as your viewers’ wants and needs—you can create picturesque outdoor scenes one day before quickly switching to a fully-equipped office environment the next, all without having to leave your home or invest in any expensive equipment.
Tips for Optimising Your Live Stream with a 3D Virtual Studio Set
Optimising your live stream using a 3D virtual studio set is largely dependent on understanding what type of visuals you’re going for and how best to achieve them. When creating images and videos for your broadcast, make sure to take into account things like aspect ratio as well as angles when setting up each shot. This will help ensure that viewers get an optimal viewing experience no matter how large their monitor screens are or where they are located geographically. Additionally, it is important to pay attention to the colour palette used in order to create an engaging atmosphere that viewers won’t forget in a hurry. Try adding bright colours here and there while keeping the overall background neutral so as not to overwhelm people who might otherwise be turned off by loud visuals.
Getting the Most Out of Your 3D Virtual Studio Set
The key to maximising what you can do with your 3D virtual studio is knowing exactly which tools you have at your disposal and how best to use them. For example, if you have access to software programmes such as Adobe After Effects and Adobe Photoshop, you can use their powerful editing tools to completely customise the look of your animations and transitions. Additionally, if you have access to a green screen or VFX software, you can use them to add special effects that are not available in regular camera setups. This is especially useful for engaging viewers by creating an immersive experience.
Understanding the Difference Between 2D and 3D Visuals for Live Streaming
When trying to create a professional live stream with a 3D virtual studio set, it is important to understand the differences between standard 2D visuals and those created in three-dimensional space. Unlike traditional camera shots, which are captured from only one angle and often do not allow for much dynamism when watching on larger screens, 3D visuals capture multiple angles at once, allowing viewers to feel like they’re really there regardless of how big or small their display is. Additionally, since all animated elements within a 3D environment obey certain laws of physics (such as gravity), scenes appear more realistic compared to regular out-of-the-box stock footage, which lacks these details.
Choosing the Right Tools for Creating Professional Live Stream with a 3D Virtual Studio Set
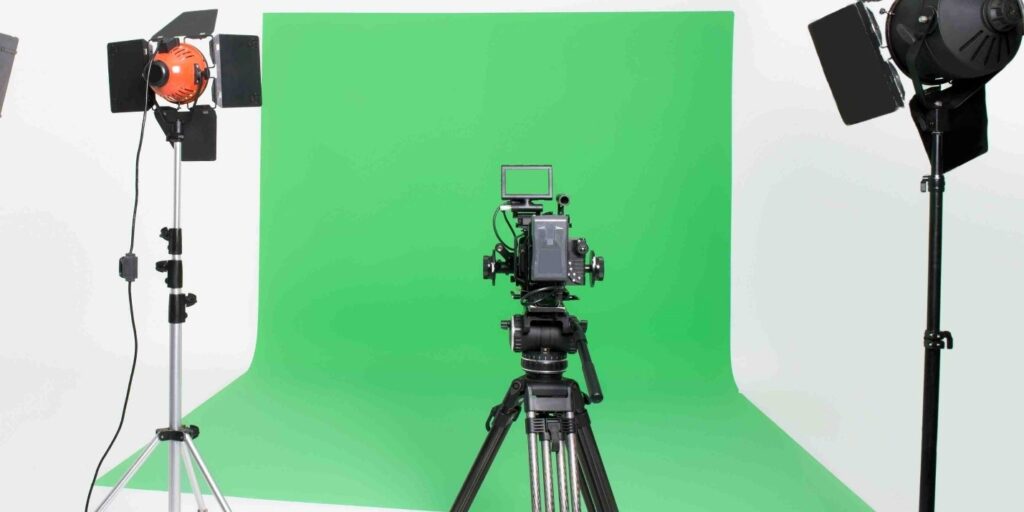
When trying to create broadcasts of professional quality with your 3D virtual studio set, it is important to know what tools you have at your disposal. The most basic components of any live stream production setup are a camera and microphone; however, there are various other bits of equipment that can help take your productions to the next level, such as tripods for stabilising shots, external lighting for adding moods or special effects, and even teleprompters for making sure you never miss a beat when delivering presentations. Other software programmes like Adobe After Effects and Adobe Photoshop also offer powerful editing capabilities, including advanced colour grading techniques that can be used to create stunning visuals tailored specifically to each individual broadcast.
How to Set Up a Professional Live Stream with a 3D Virtual Studio Set
Setting up your professional live stream with a 3D virtual studio set is relatively straightforward but requires some prior knowledge on the part of the content creator. First off, make sure you have all of the necessary equipment such as cameras and microphones in place before starting up any software programmes. This will assist later on in ensuring everything runs smoothly during filming or broadcasting. Next, familiarise yourself with creating scenes or sequences within whatever programme you’re using (such as Unity or Unreal Engine) so that viewers won’t get confused between different angles or shots. Finally, once everything is set up and running, it’s time to start streaming. Make sure that you have a strong internet connection as well as good lighting and audio quality so viewers will have an enjoyable viewing experience no matter where they’re located.
Troubleshooting Common Issues When Setting Up A Live Stream With A 3D Virtual Studio Set
When setting up your live stream with a 3D virtual studio set, there are several common issues that may arise that can be easily remedied using the right tools. First off, if you’re experiencing lag or buffering during recording or streaming, this could be due to low bandwidth. Try utilising a premium connection to limit any interruptions from arising in the first place. Additionally, make sure all of your equipment, including cameras and microphones, is properly connected before starting up any software programs—otherwise, technical difficulties could occur during filming or broadcasting. Finally, always remember to follow best practises for optimising both visuals and audio when creating content; this will ensure that viewers get the best possible picture and sound quality regardless of how far away they might be located geographically.
Techniques to Enhance Viewer Engagement Through Creative Use of A 3D Virtual Studio Set
Using a 3D virtual studio set to create your live stream offers an array of opportunities for content creators wanting to up the ante with their productions. One way to do this is by incorporating creative transitions such as dissolves, wipes, or fades, which can help add dynamism and flow between shots. Other techniques include dynamic camera movement (such as panning and zooming) as well as scene changes, which can act like little mini “a-ha” moments that viewers won’t forget in a hurry—both tactics are great for creating exciting visuals that will keep users engaged throughout the entire broadcast.
Best Practises for Ensuring Quality and Consistency in Your Live Stream With A 3D Virtual Studio Set
The key to ensuring quality and consistency in your broadcasts when using a 3D virtual studio set lies in understanding two main concepts: workflow optimisation and colour balance. Workflow optimisation involves taking into account how quickly each shot should be filmed or streamed so that nothing gets overlooked, whereas colour balance refers to making sure all images have the correct shades, highlights, midtones, and shadows (in other words, make everything look the same.). Additionally, don’t neglect basics such as audio quality—make sure you check levels regularly during recording or streaming and make sure that any external noise is filtered out so as not to distract viewers from the main content.
FAQs:
The biggest advantage that comes with using a 3D virtual studio set for live streaming production is being able to utilise multiple angles simultaneously while filming, unlike in standard 2D camera setups where this isn’t possible due to space limitations or budget restrictions. Additionally, you can also customise your virtual set according to your own vision as well as your viewers’ wants and needs, making it much easier for content creators to create unique visuals tailored specifically for each individual broadcast.
Setting up a live stream with a 3D virtual studio setup requires some prior knowledge on the part of the content creator, but once you have all of the necessary tools in place (such as cameras, microphones, and software programmes), broadcasting should be fairly straightforward—make sure you have good lighting, good audio quality, and an internet connection before starting so viewers get an optimal viewing experience no matter where they are located geographically.
When using a 3D virtual studio set for live streaming production, it is important to familiarise yourself with specific tools available, such as software programmes like Adobe After Effects and Adobe Photoshop, and have an understanding of colour theory in order to create the most engaging visuals tailored specifically for your broadcasts. Additionally, you should also know what type of audio equipment (such as tripods and external microphones) you need in order to get the best possible sound quality when broadcasting.
Absolutely. Depending on what software programme you’re using (such as Unity or Unreal Engine), there are plenty of ways that you can customise your 3D virtual studio set so that viewers won’t forget your broadcast in a hurry—try creating custom backgrounds or textures or adding dynamic transitions between shots instead of sticking solely with static images or videos during filming or streaming .
When trying to ensure that viewers get the best possible quality with your 3D virtual studio live stream, it is important to understand two main concepts: workflow optimisation and colour balance. Workflow optimisation involves taking into account how quickly each shot should be filmed or streamed so that nothing gets overlooked, whereas colour balance refers to making sure all images have the correct shades, highlights, midtones, and shadows (in other words, make everything look the same.). Additionally, don’t neglect basics such as audio quality—make sure you check levels regularly during recording or streaming and make sure any external noises are filtered out so as not to distract viewers from the main content.
When creating content with a 3D virtual studio set for broadcast purposes, it is important to take into account aspects such as aspect ratio in order for viewers not just on big screens but also on smaller ones to have an optimal viewing experience. In terms of colours, try adding bright colours here and there while keeping the overall background neutral so as not to overwhelm people who might otherwise be turned off by loud visuals—this will help ensure viewers stay engaged throughout your entire broadcast.
Yes. Software programmes like Adobe After Effects and Adobe Photoshop offer powerful editing capabilities, including advanced colour grading techniques that can be used to create stunning visuals tailored specifically for each individual broadcast. Additionally, if you have access to a green screen, you’ll also be able to add special effects that are not available in regular camera setups, making them great for creating an immersive experience for viewers.
When trying to optimise your audio during live streaming production with a 3D virtual studio set, it is important to have the right equipment (such as external microphones) in place beforehand as well as checking levels regularly while broadcasting or recording so that everything sounds perfect regardless of how far away viewers might be located geographically. Additionally, make sure any external noise is filtered out before going live; this will ensure that nothing distracts viewers from the main content being presented onscreen and they get the optimal viewing experience.
One of the best ways to market your live stream using a 3D virtual studio set is by leveraging social media platforms such as YouTube, Twitch, and Instagram. Create an account or channel on each one and post trailers or teaser clips that showcase some of the visuals you’ll be creating during broadcasts, which will help get people interested in tuning into your shows. Additionally, make sure you actively communicate with your audience before, during, and after streaming, as this will foster viewer loyalty and ensure they come back time and time again.
Yes. There are several ways you can cut costs when trying to produce professional quality broadcasts from home using a 3D virtual studio set. First off, consider buying used equipment instead of new where possible; depending on what type of camera or audio gear you need, it could potentially work out cheaper than getting everything brand-spanking new (just make sure it works correctly before purchasing). Secondly, think about utilising free hosting services such as YouTube Live or Twitch to broadcast your streaming—this way you won’t have to pay for expensive streaming services every single time someone watches one of your shows. Finally, think about utilising royalty-free music as opposed to paying for costly music licences, which could save you plenty of money in the long run.
Thilina is a multi-skilled digital marketing professional and technical specialist at Sotavento Medios. He manages essential technical SEO audits, search engine indexing, and automated workflows. With experience spanning website management, Google Ads, and campaign execution, he ensures digital assets remain optimized for generative search engines.